Proxmox Backup Server Setup & Usage
How to get setup to use our backup service! If you need assistance, please contact us at support@untangledtechnology.com
- Getting Started & Setup
- Accessing the Server
- Connect Proxmox Virtual Environment to Proxmox Backup Service
- Install Proxmox Backup Client (Debian-Based Linux Users)
- Backups
- Maintenance for Backups
Getting Started & Setup
Connecting your environment to PBS
Accessing the Server
You should have received an email with your login credentials, your client encryption key and the server link from support@untangledtechnology.com. Please make sure to save the encryption key on your server.
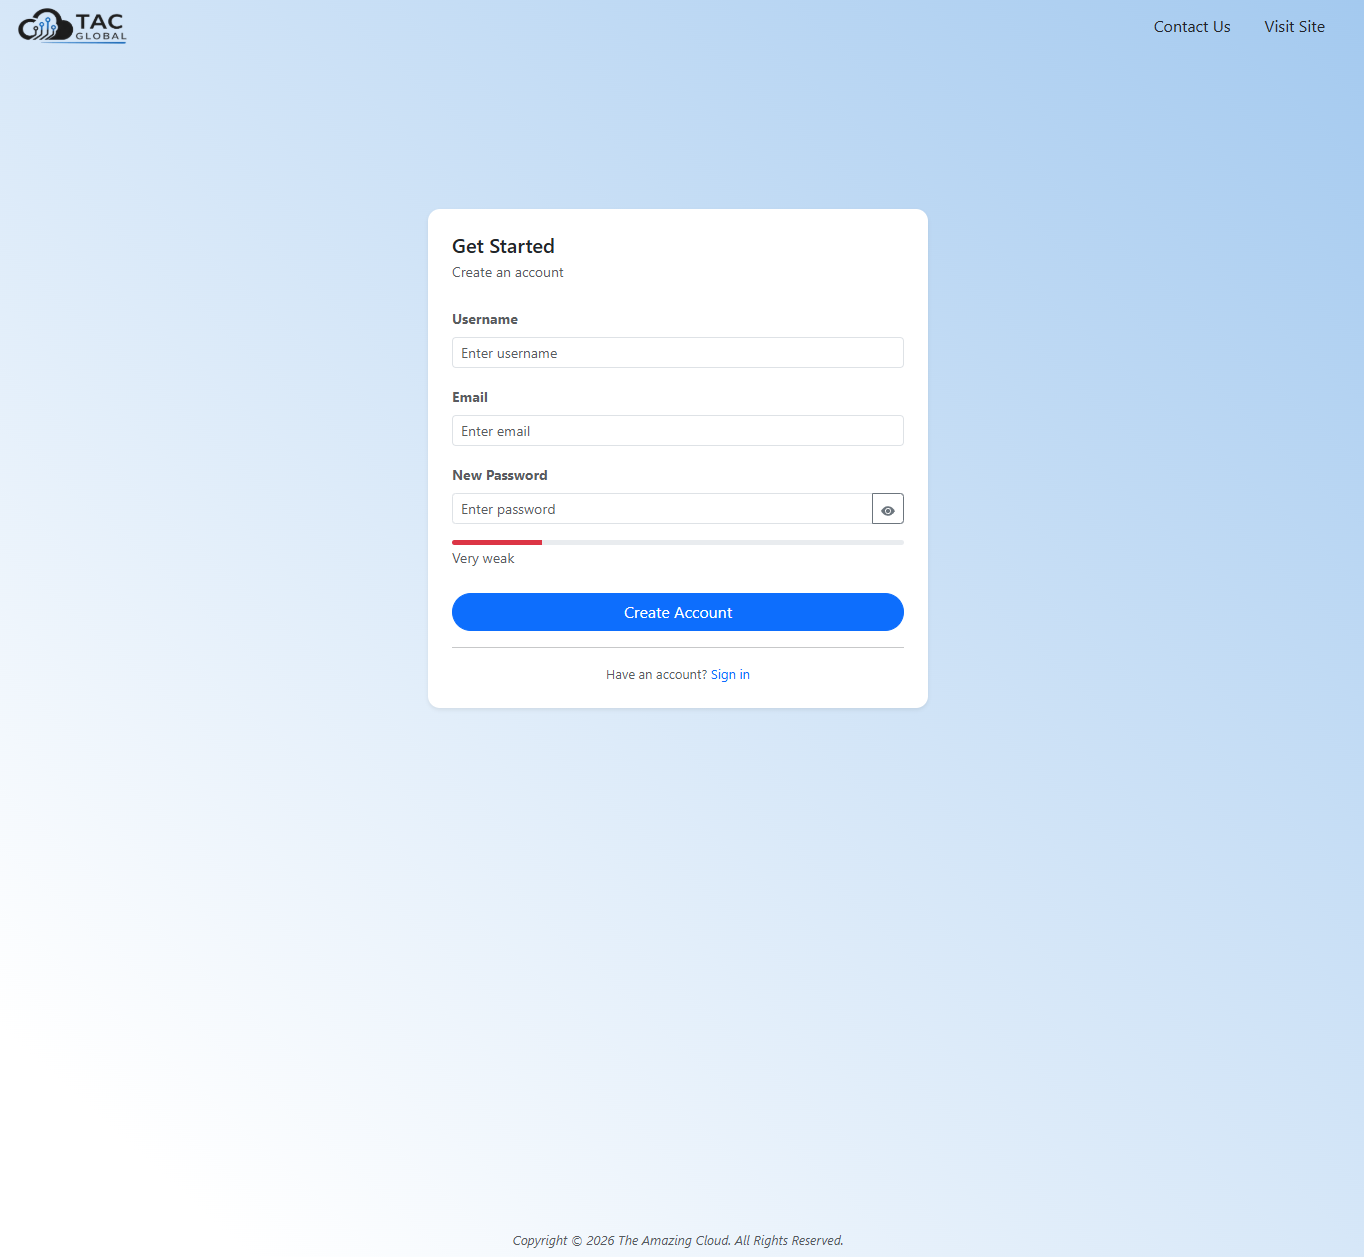
To access your PBS server, please make an account through the TAC dashboard here
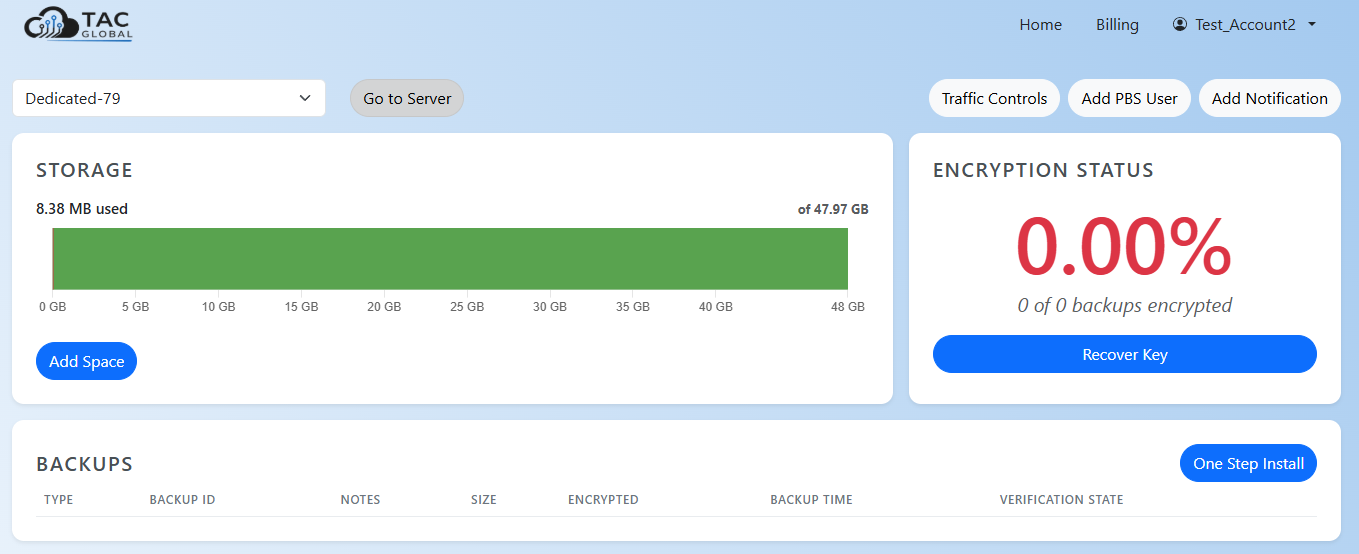
Once logged in, you can access your server through the home dashboard
Connect Proxmox Virtual Environment to Proxmox Backup Service
Before you start
- Onboarding email with your PBS server address, datastore name and credentials
- Admin access to your Proxmox VE web interface
- (Optional) Installer link received on order confirmation page
Steps
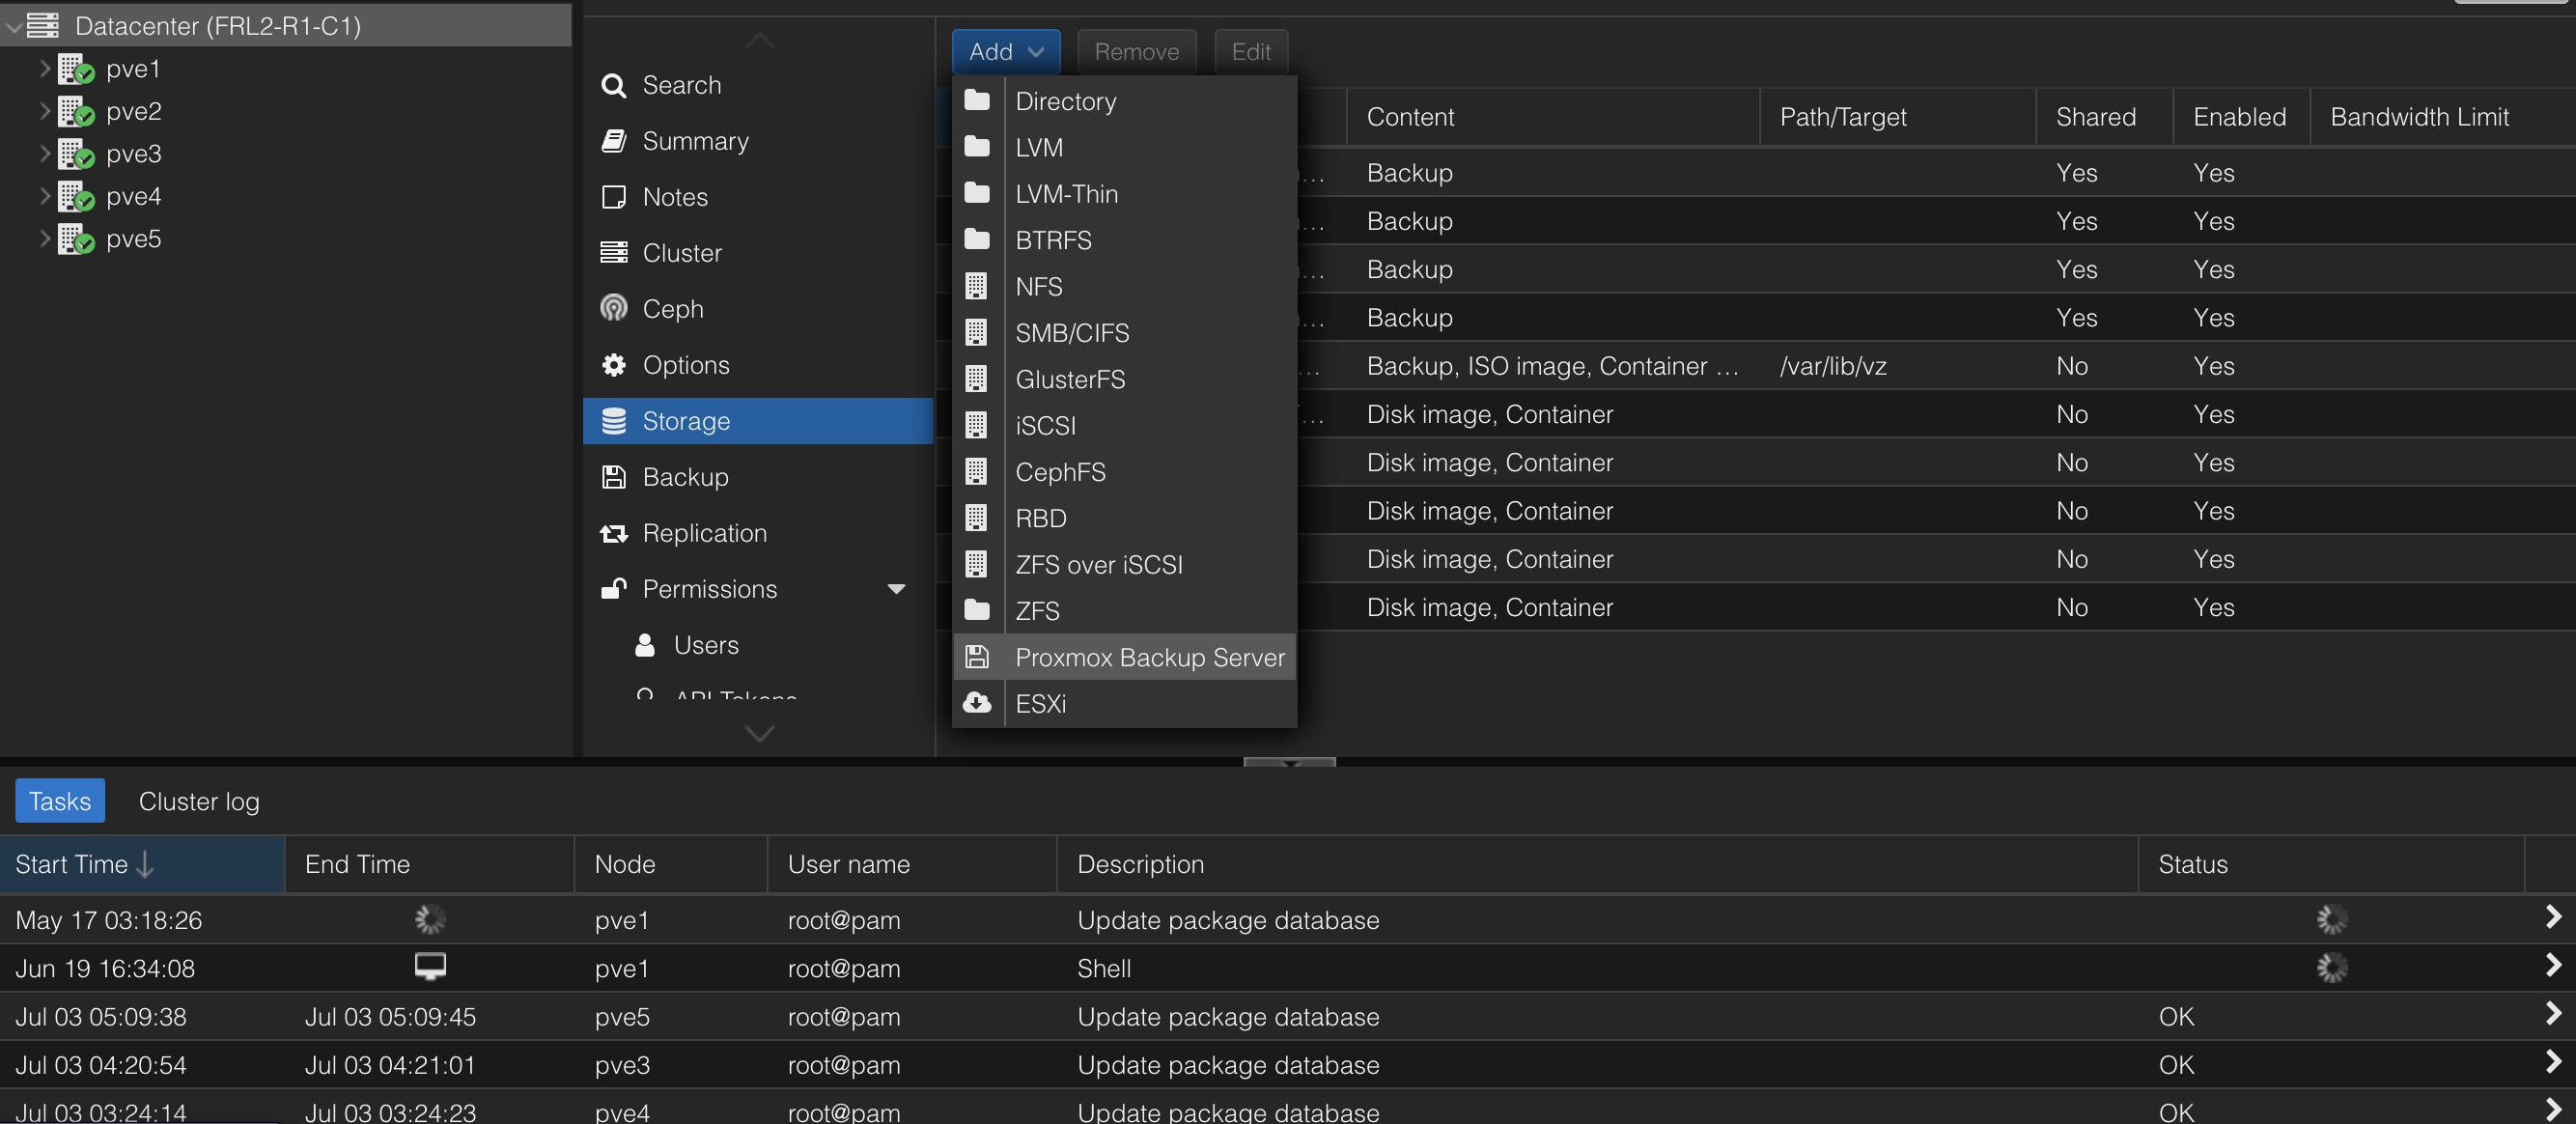
In Proxmox VE, go to Datacenter > Storage > Add > Proxmox Backup Server
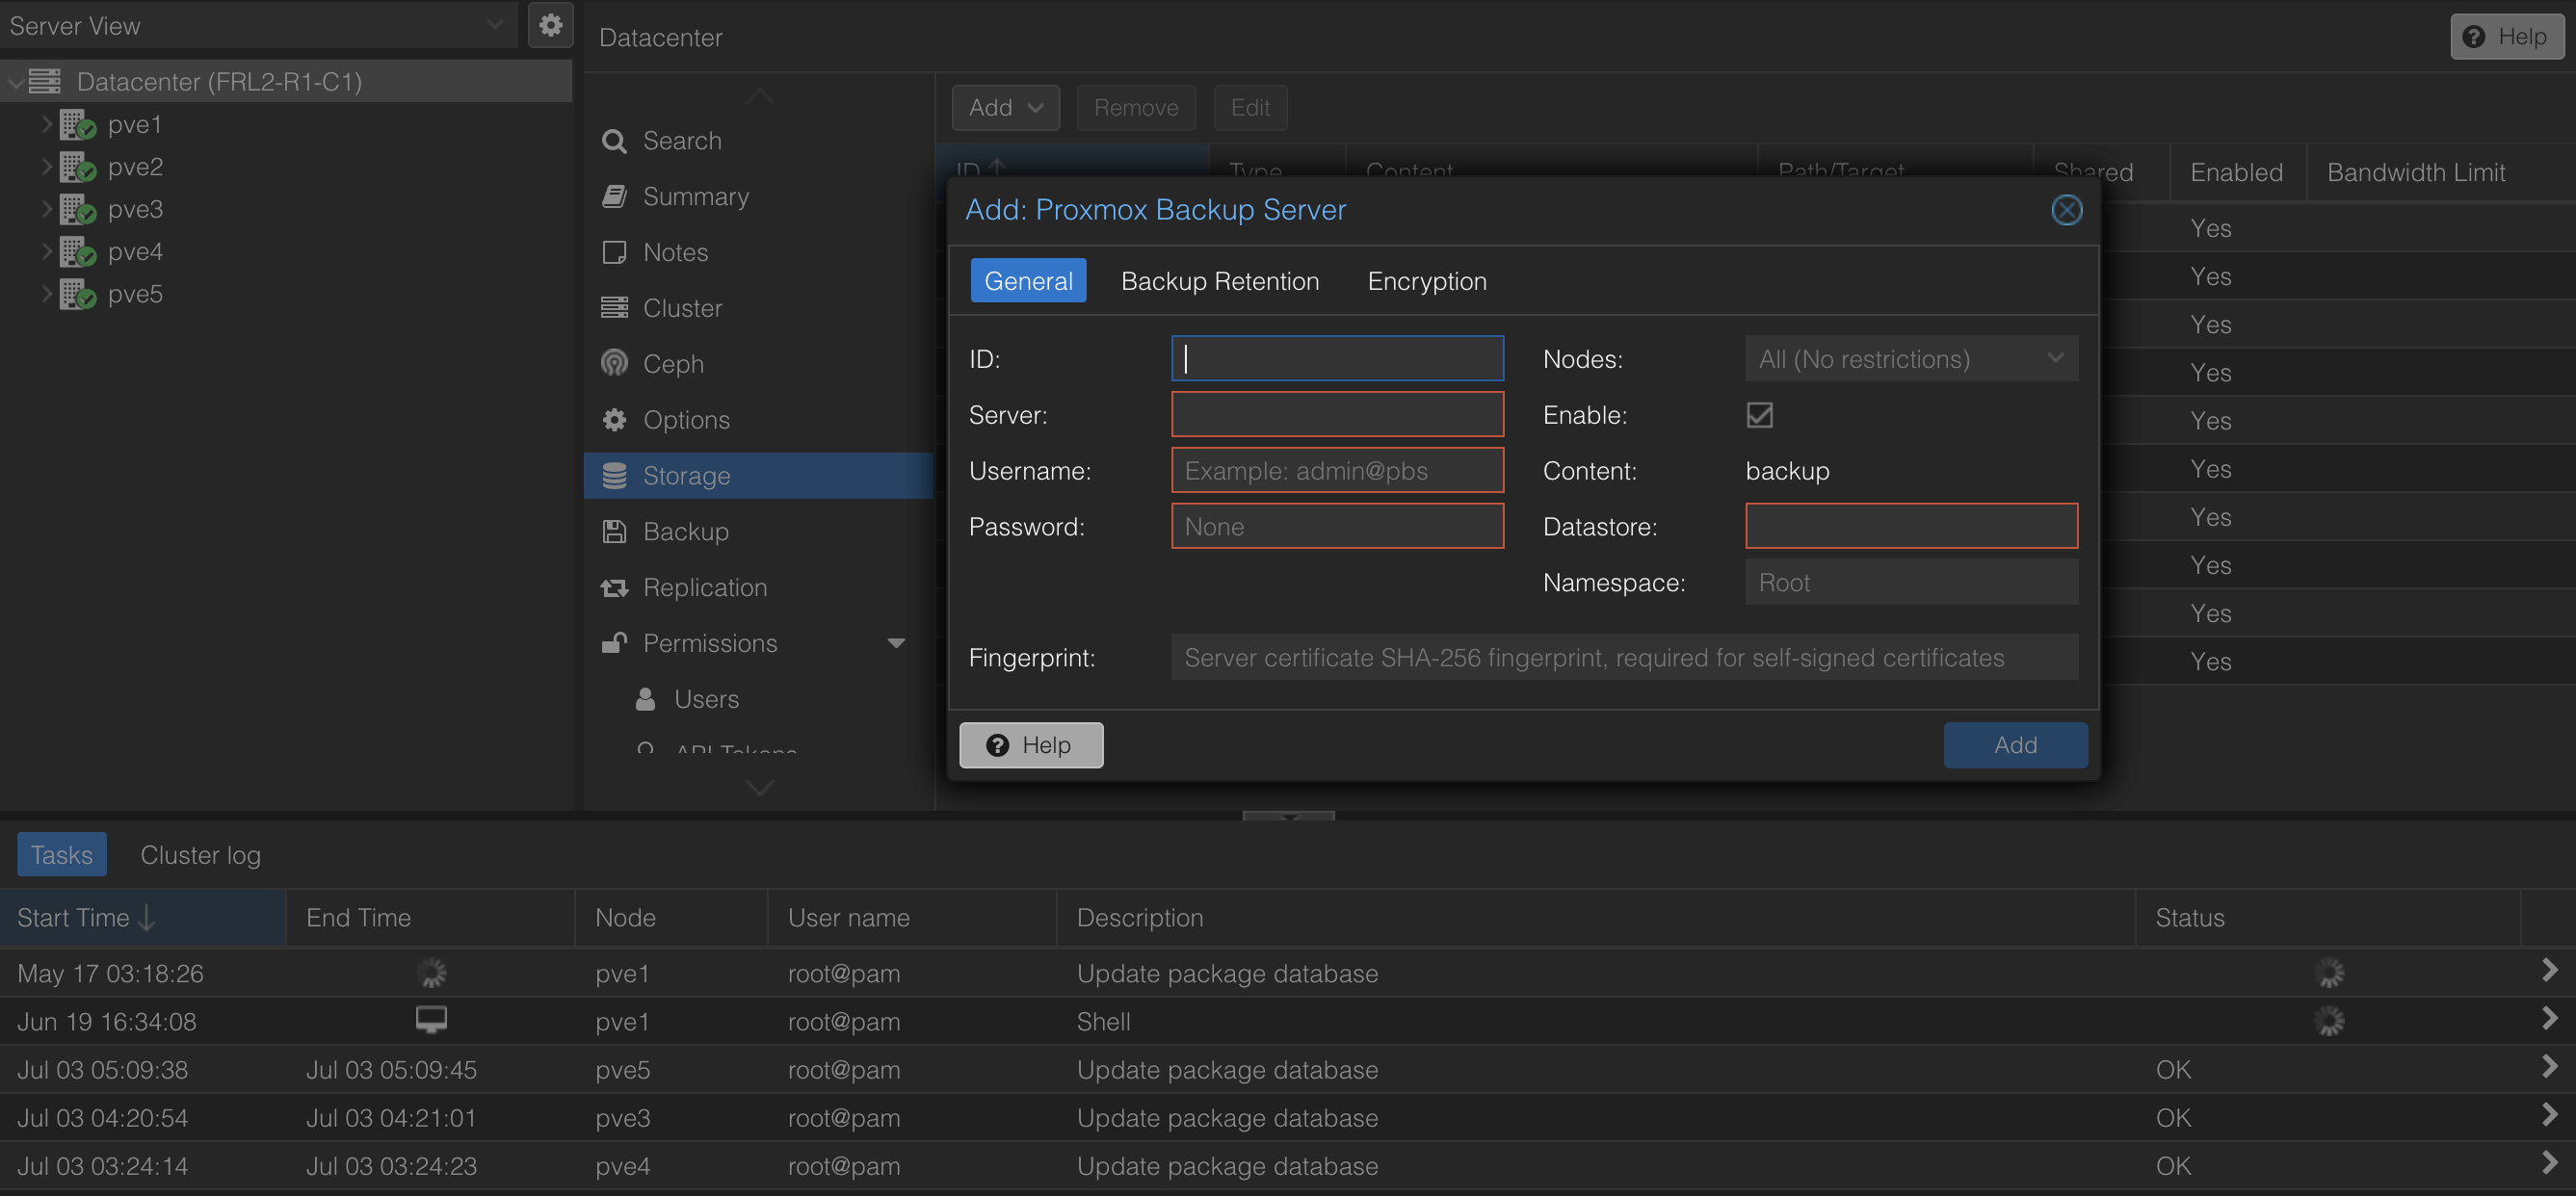
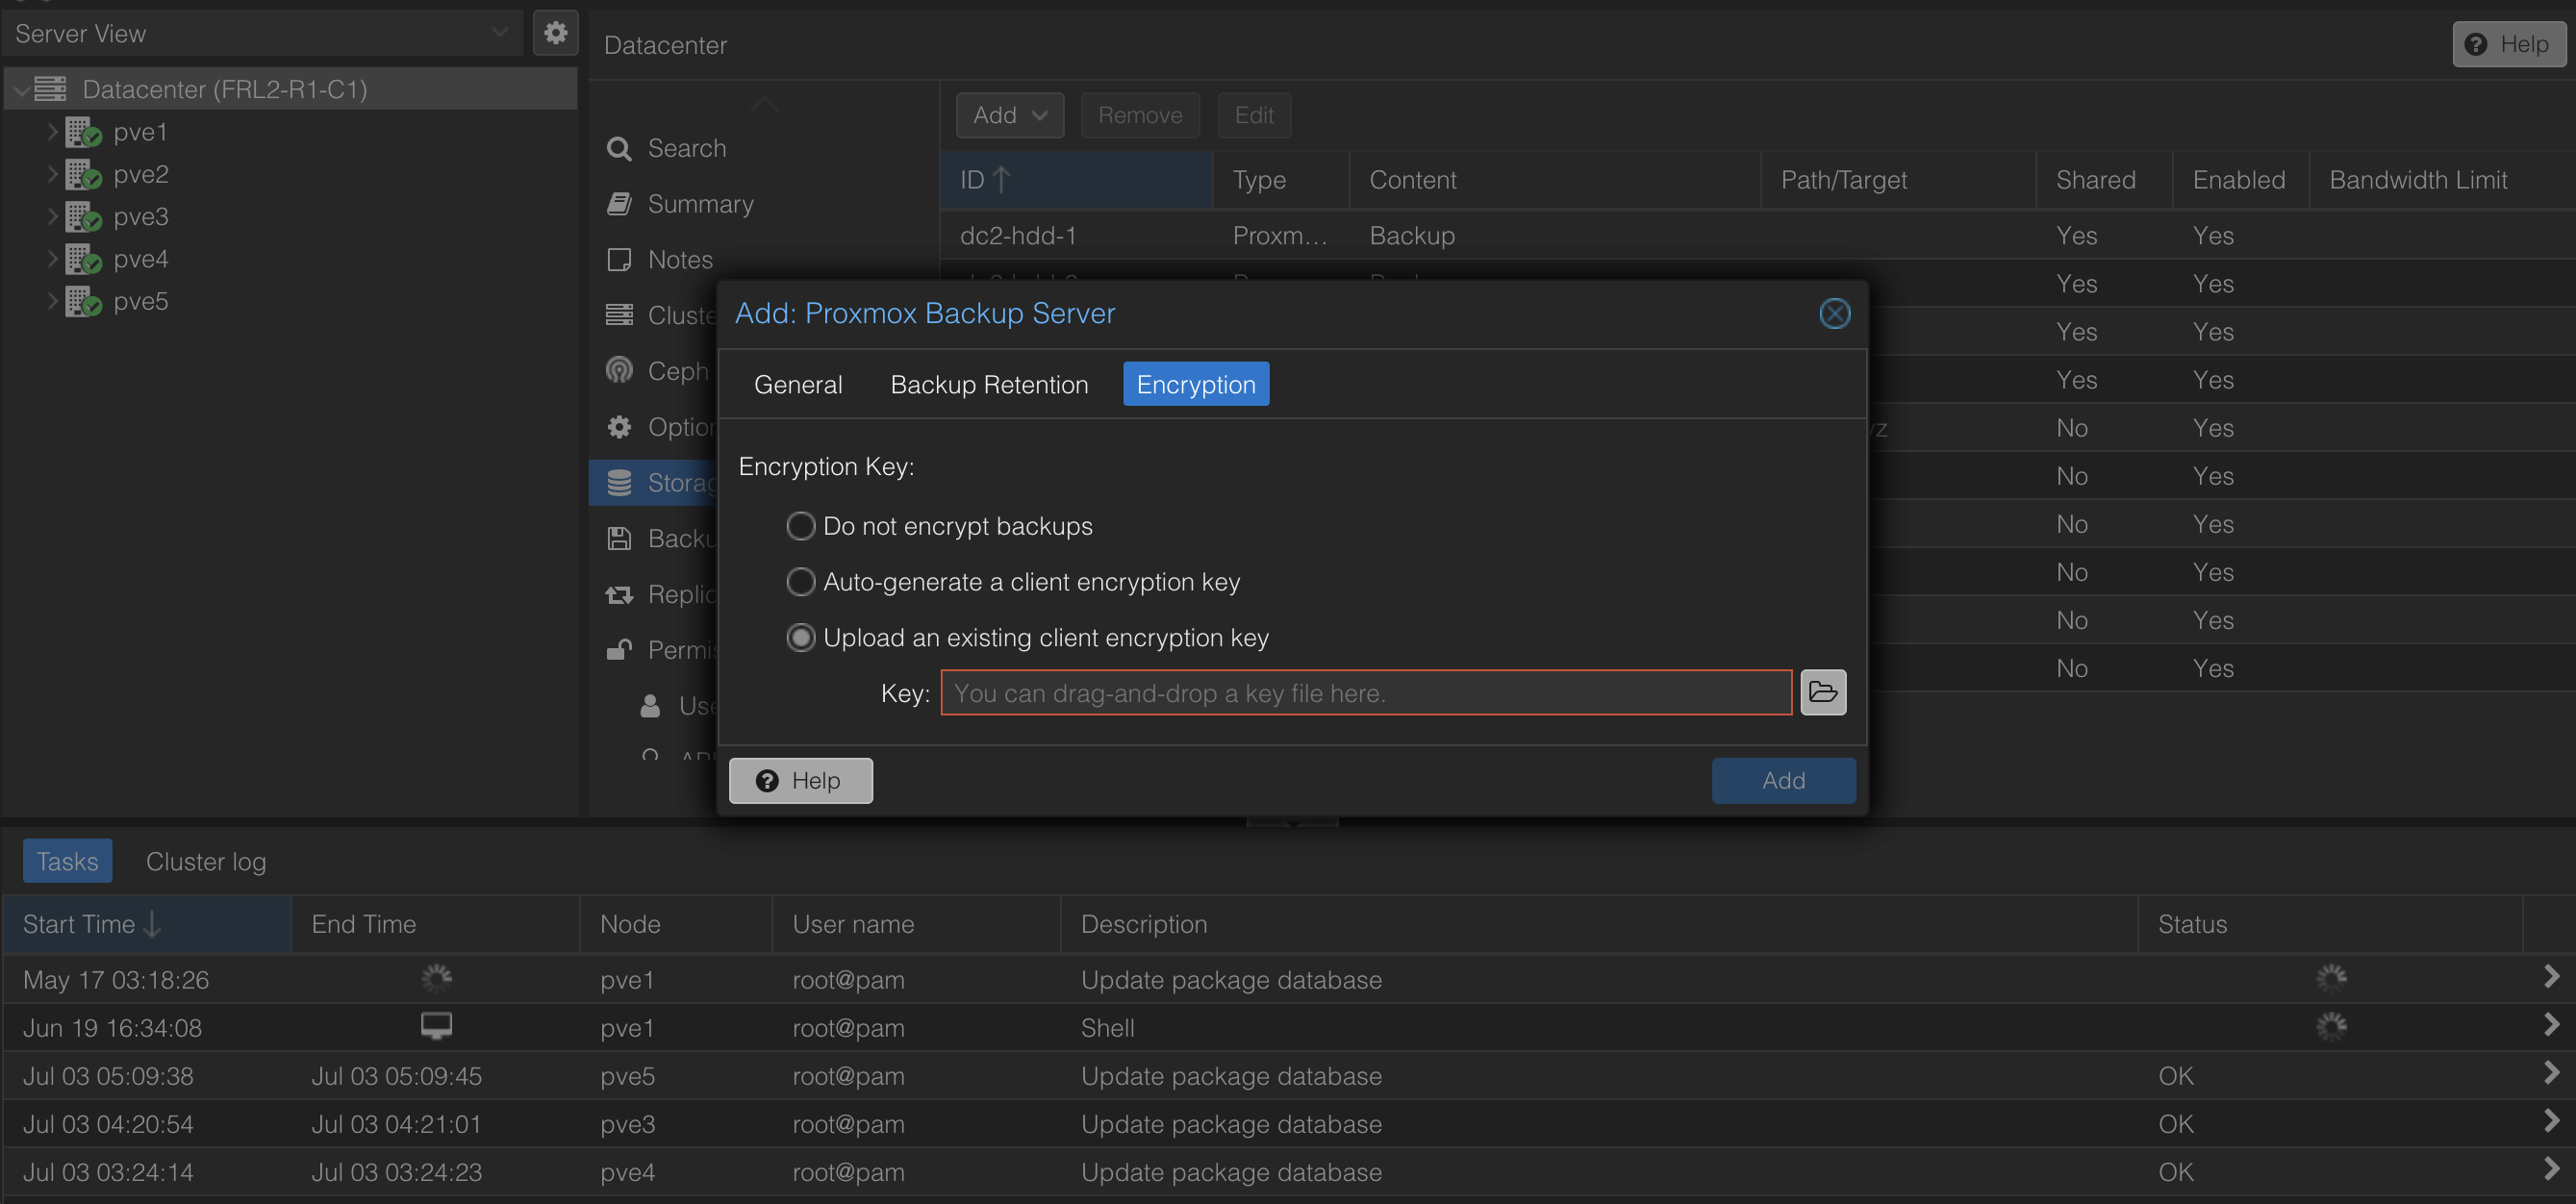
Enter the PBS address, username, password, fingerprint and encryption key from your onboarding email. If you are on the shared plan your datastore is the same as your username. For the dedicated plan, the datastore is zpool1.
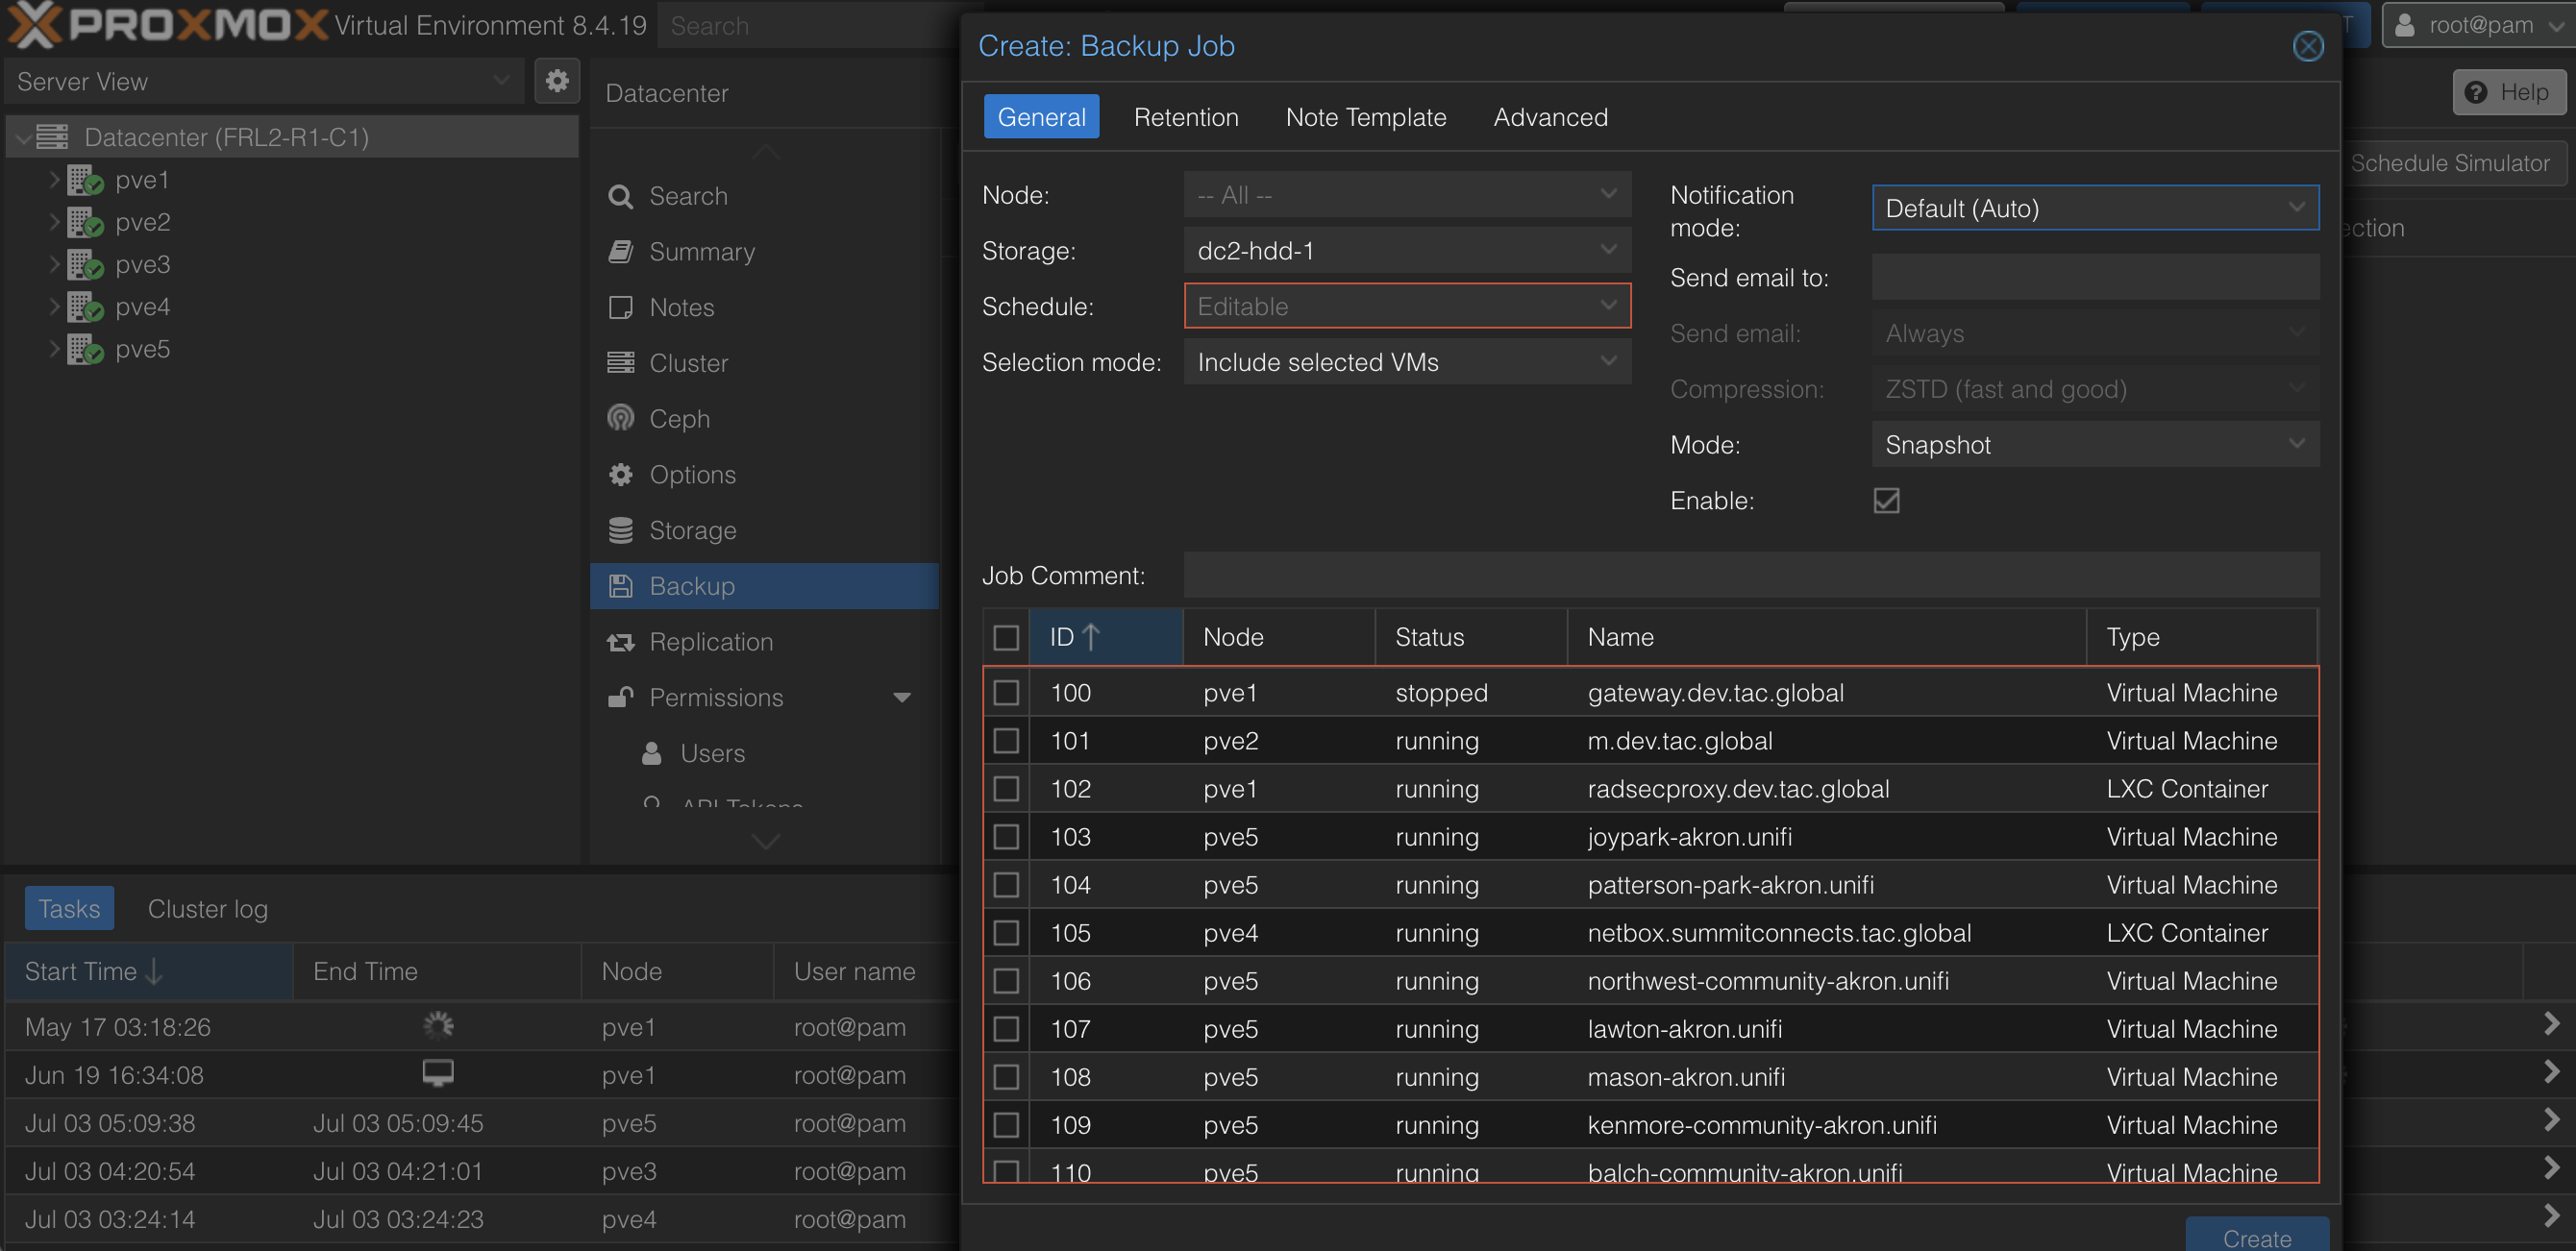
Once connected, you can create a backup job under Datacenter > Backup > Add. You can choose which VMs/containers to backup and the schedule. If you'd like to receive notifications, enter your email to get notified for job fails/successes.
To retain backups, go to the Retention section and you can set what number of backups are most recently kept and which are let go after a week up to a year.
Install Proxmox Backup Client (Debian-Based Linux Users)
Before You Start
- Root access on the Linux server
- Onboarding email with PBS hostname, username, password, fingerprint and encryption key.
Steps
To configure the repository, you will need to setup the Proxmox release key first. On your server, get the key from the following site below and replace the [debian version] with your server version (bookworm, bullseye):
https://enterprise.proxmox.com/debian/proxmox-release-[debian version].gpgMove the key into /usr/share/keyrings/
In /etc/apt/sources.list.d/ create a file named proxmox.sources to add the repository.
   Types: deb
   URIs: http://download.proxmox.com/debian/pbs
   Suites: [debian version]
   Components: pbs-no-subscription
   Signed-By: /usr/share/keyrings/proxmox-release-[debian version].gpg
Install the client
apt update
apt-get install proxmox-backup-client
Once the install is completed, run the command proxmox-backup-client and you should see the user manual printed.
Backups
Managing backups for PVE or a Linux server
Create a Backup Job (PVE)
Before You Start
Proxmox Virtual Environment Root/Admin access on web page
Onboarding email with PBS hostname, encryption key, fingerprint, username and password
Steps
If you connected your backup server using the installation script, then you do not need to setup a job unless you would like more than one.
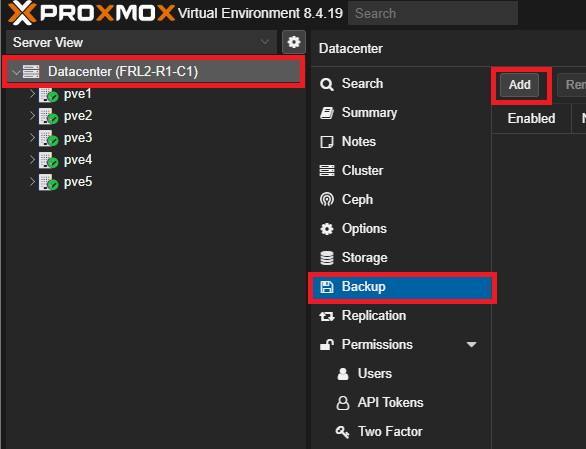
First, login to your Proxmox VE and go to Datacenter > Backup and hit Add.
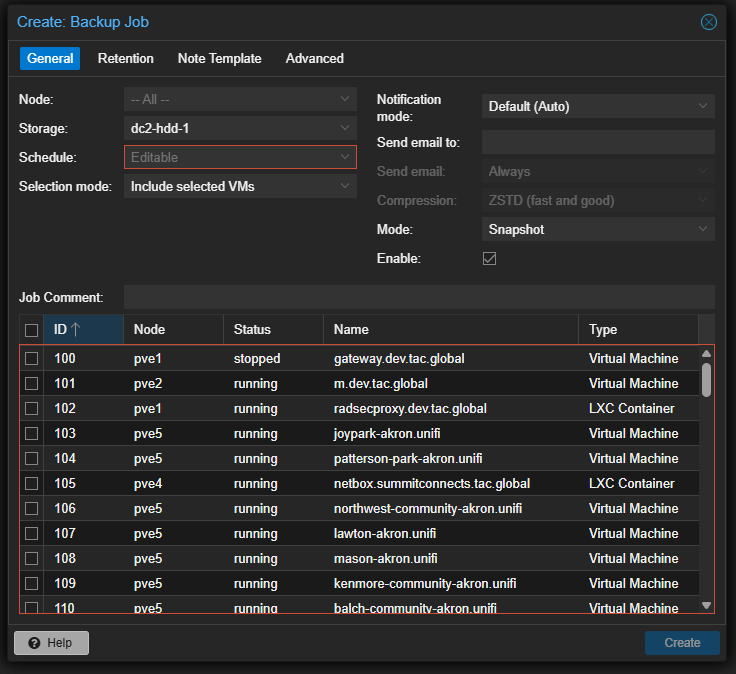
Under General, choose which nodes you'd like to backup from, the schedule the job should run and which emails the job sends notifications to and any job comments. You can specify which virutal machines/containers get backed up to the Proxmox Backup Server, but you must select at least one to proceed.
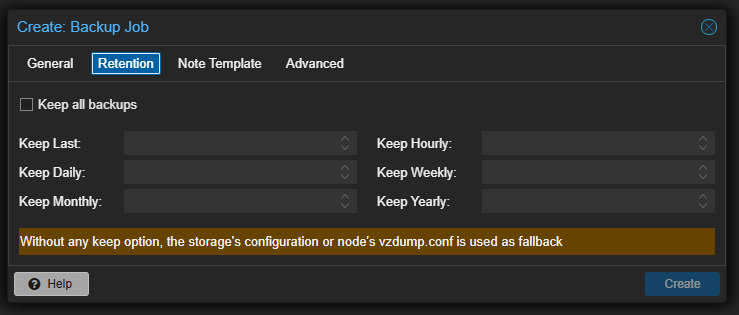
Under Retention, you can determine how long backups are kept. The rules stack so backups can be kept if multiple rules are true at once. If you need a guide for retention policies, go here.
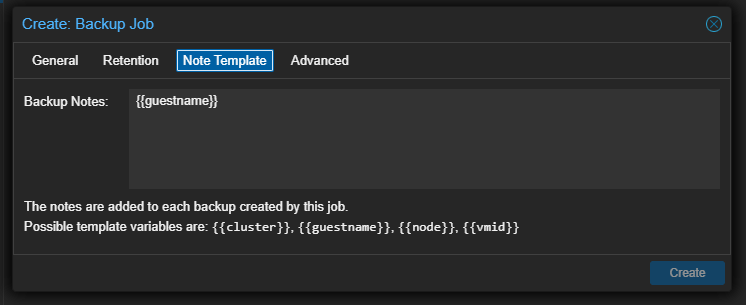
Under Node Template, you can specify notes for each backup. As seen below, you can use template variables to differentiate between each backup.
Once finished, hit create. Your backup job will run on the schedule chosen and all success/failure notifications will be sent to the email specified.
Create a Backup Job (Linux)
Before You Start
Proxmox Backup Client Installed (Instructions to Install Proxmox Backup Client)
Onboarding email with PBS hostname, encryption key, fingerprint, username and password
Steps
Login to the PBS server to save your credentials for this session. Shared users, the datastore is the same as your username and dedicated users, the datastore is named zpool1.
proxmox-backup-client login --repository [username]@pbs@[server]:[datastore]Once entered, you'll be asked for your password.
The commands to run backups are as follows:
Backup Entire System
proxmox-backup-client backup root.pxar:/ --repository [username]@pbs@[server]:[datastore]Backup Specific Paths
proxmox-backup-client backup root.pxar:[path/to/backup] \
  --repository [username]@pbs@[server]:[datastore]
  --keyfile /path/to/encryption/file.key
To run as a scheduled job, you can run the commands as a scheduled cron job. If you would like to exclude any files from being backed up, use the --exclude tag to specify any paths or files.
To confirm the backups were sent, run the following command:
proxmox-backup-client snapshot list --repository [username]@pbs@[server]:[datastore]Restoring Your Backups
Restoring a Backup to Proxmox VE
With Proxmox VE, you can restore a full machine/container or specific files on a machine/container. Both methods are listed below.
Full Disk Restore
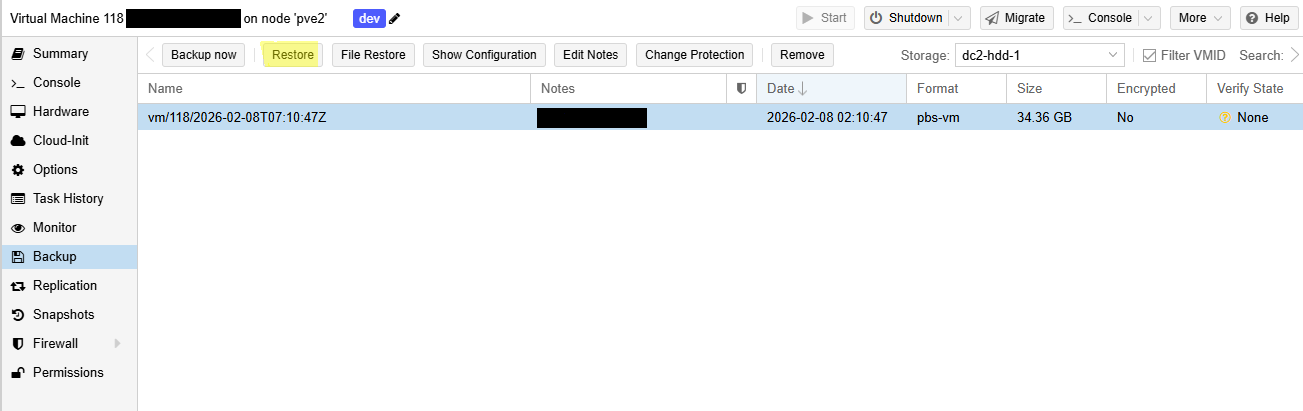
To restore an entire virtual machine or container, select Restore.
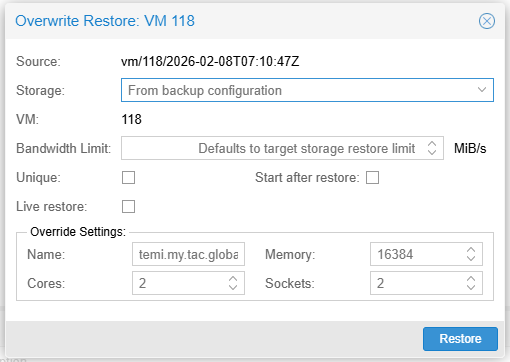
You will be prompted with the following. If there is a virtual machine or container with the same ID it will be overwritten once you select Restore.
File Restore
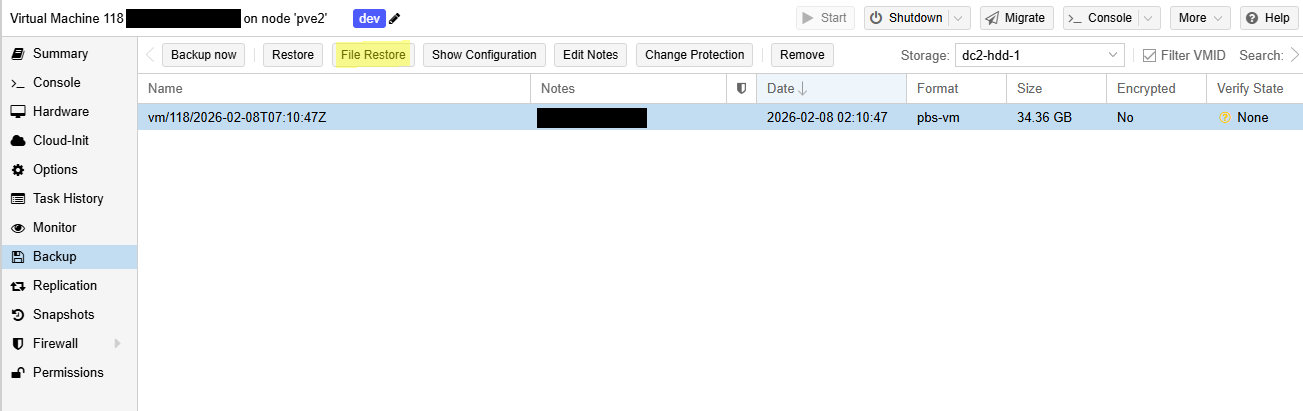
To restore a file, select the virtual machine or container you would like and select the Backup tab. Select File Restore.
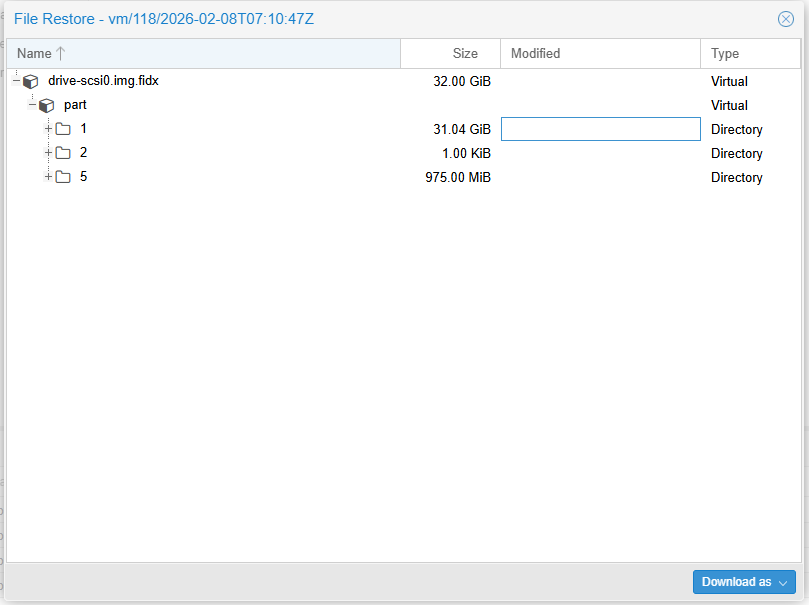
Under the backup archive, please select the file(s) you would like to restore. Select Download.
Restore a Backup to a Linux Server
First, ensure that you have the encryption key file ready to go. If you have forgotten it, please check your onboarding email or the dashboard to recover your key.
To connect to the backup server repository, login with the following command. You will be prompted to enter your password.
proxmox-backup-client login --repository [username]@pbs@[server]:[datastore]Once you have successfully logged in, run the following command to see your backup snapshots.
proxmox-backup-client snapshot listTo restore your selected files you can use the following command
proxmox-backup-client restore [host/example/2026-01-30T23:06:35Z] index.json --repository "" --keyfile /path/to/keyfileHow to Remove Backups
To remove backups from Proxmox VE, navigate to the virtual machine or container you would like to remove. Once you are there, go to the backup tab. You should see the list of backups for your vm.
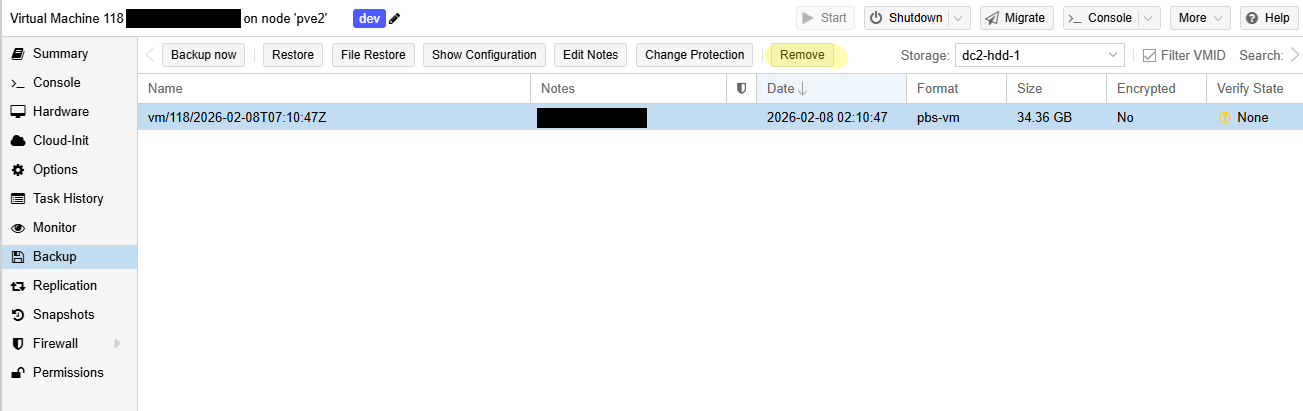
Select the backup you would like to remove and select the remove button.
Pruning allows you to specify which backup snapshots you want to keep and which ones you'd like to remove. To prune a single backup, within your Proxmox backup server account's datastore navigate to the snapshot you'd like to prune. Pruning keeps your backups in a recycle bin, to truly remove it you will have to run garbage collection.

You can schedule pruning jobs under the Prune & GC Jobs under your datastore.
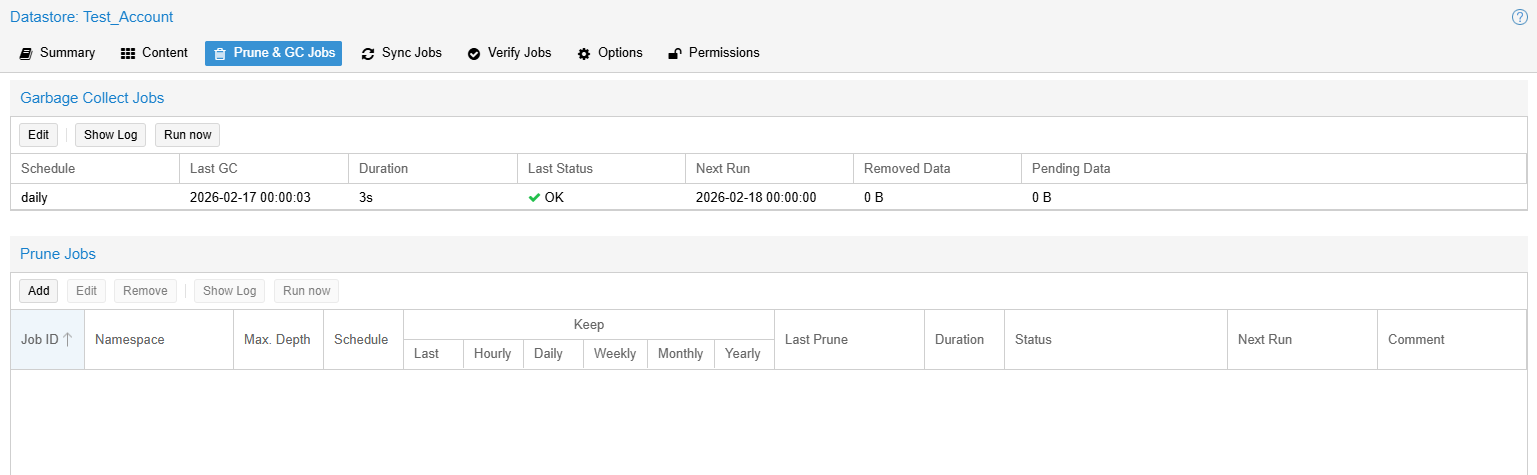
You can add a new prune job, for details on how to set up your prune job, please refer to Proxmox's Official Documentation
If you'd like to skip the pruning step, you can go ahead and permanently delete the snapshot as well.

Maintenance for Backups
Verification, Pruning and Garbage Collection
Verification Jobs
What is a verification job?
On Proxmox Backup Server, a verification job checks all the backups you have on your datastore to ensure there hasn't been any corruption or bit rot. Usually it is best to schedule verification jobs whenever you are not backing up data to your datastore or around any downtime.
Setting Up a Verification Job
To setup a verification job, you can either login to your backup server or the TAC.GLOBAL dashboard. We advise setting up your verification job through the dashboard since you can enable email notifications for the status and runtime of your verification job.
Login to the dashboard here.
On the home page, navigate to the verification job table.

In the bottom right corner, click to add a new job.

You can set how many days you'd like the verification status to last, but once the verification outdated number of days has passed your verification job will check the backup to ensure no corruption/bit rot.
Pruning Jobs & Retention Policy
Setting Up A Prune Job
There are two ways you can set up/schedule a prune job. You can do it through the backup server or through the dashboard. We suggest setting it up through the dashboard.
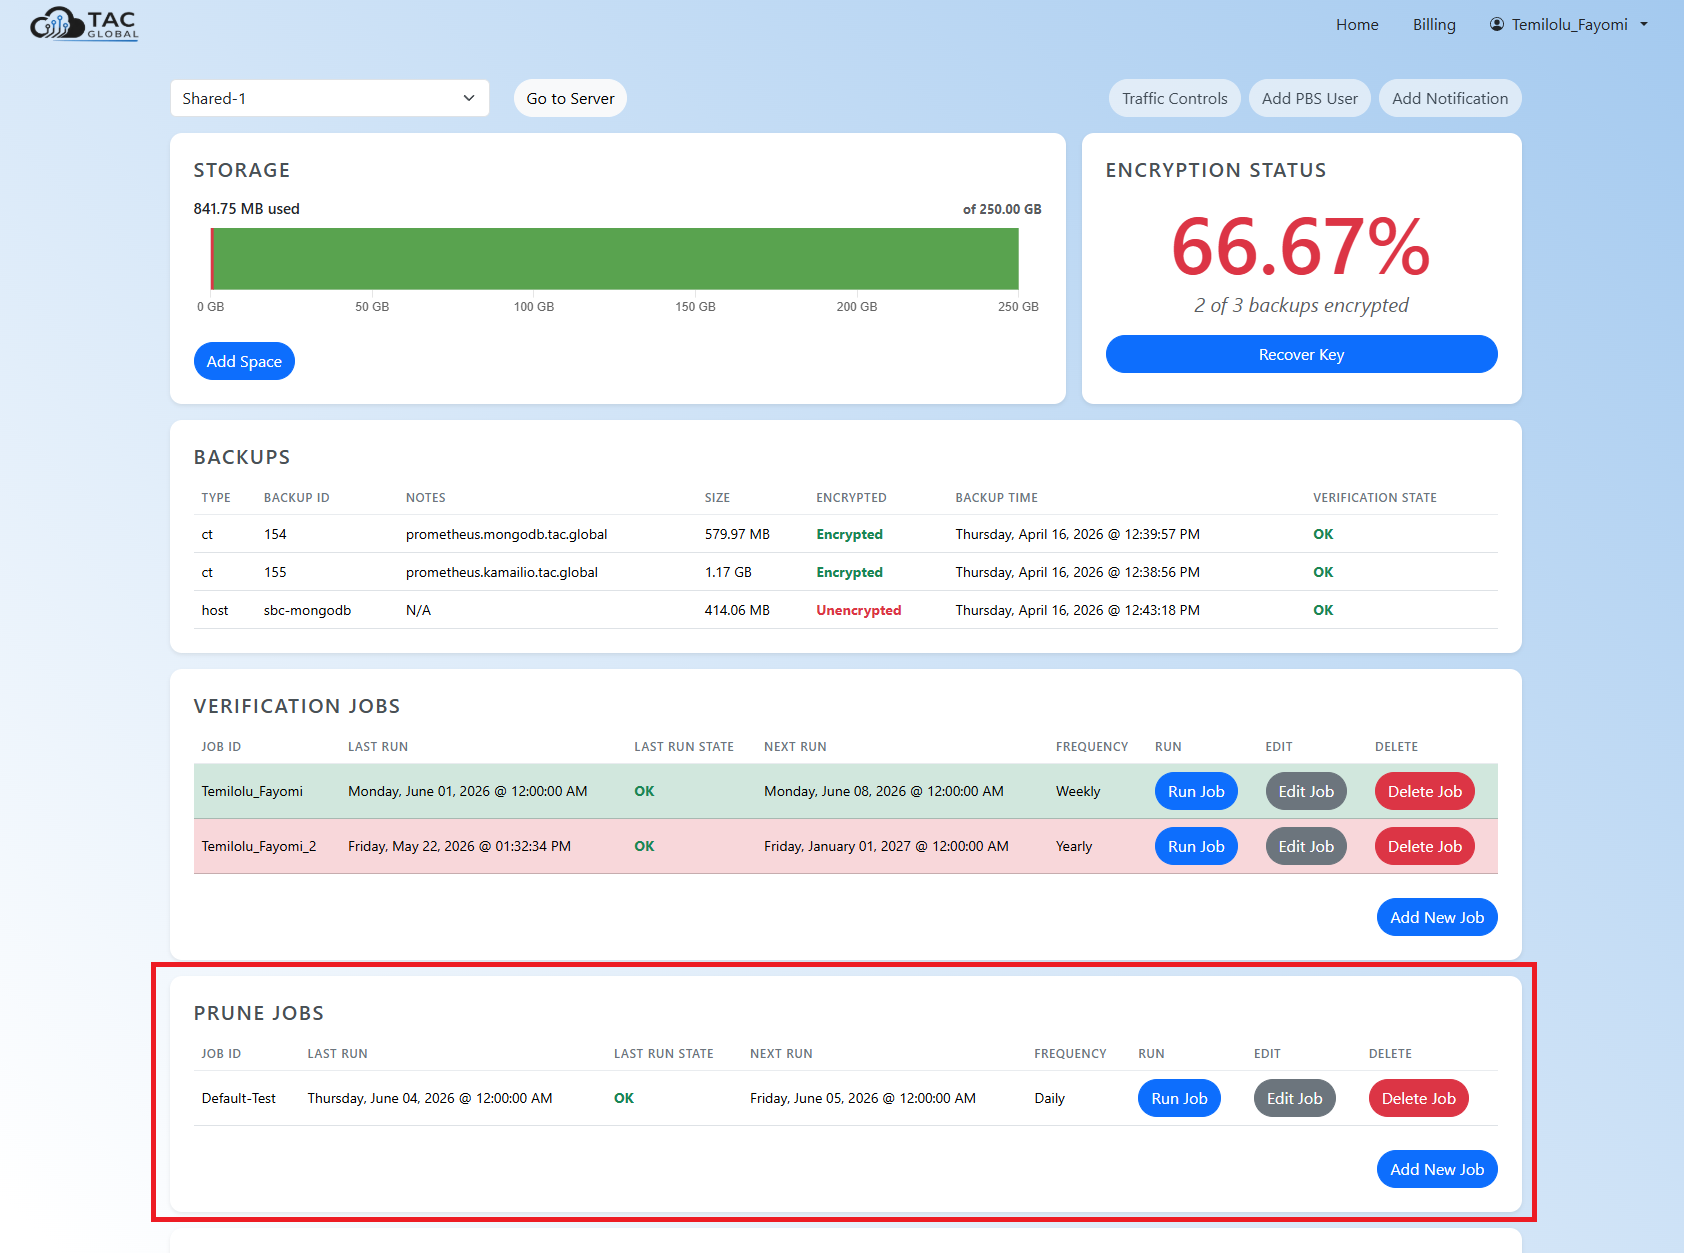
Under there you can view, edit, run or delete any existing jobs. To add a new job, hit Add New Job under the prune job table.
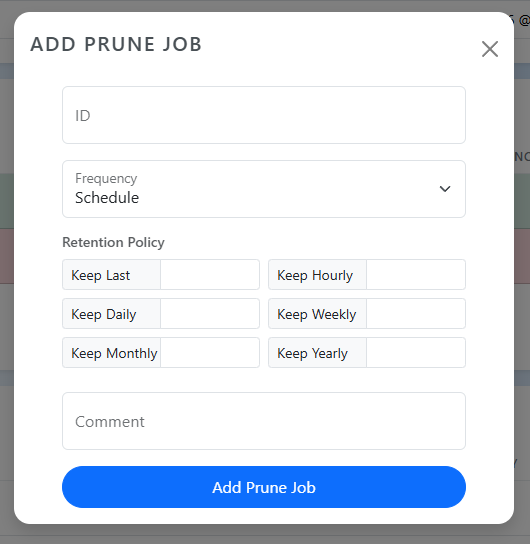
Once the prune job is added, it will show up in the prune jobs table.
Retention Policies
With pruning jobs you can set how long you'd like backups to be kept for. You can define multiple rules for the retention policy and a backup can be kept if it satisfies multiple rules defined. Pruning only removes the reference of your backups to your datastore, but it doesn't remove the actual backup. Backups are only removed when a garbage collection job is run. The table below refers to all the retention policy rules that can be applied. Proxmox also has a pruning job simulator you can use to visualize your rules.
| Option | What it keeps | Example |
|---|---|---|
keep-last |
The N most recent backups, regardless of age | 3 — always keep the last 3 backups |
keep-hourly |
One backup per hour, for N hours | 24 — one per hour for the last day |
keep-daily |
One backup per day, for N days | 7 — one per day for the last week |
keep-weekly |
One backup per week, for N weeks | 4 — one per week for the last month |
keep-monthly |
One backup per month, for N months | 6 — one per month for the last half-year |
keep-yearly |
One backup per year, for N years | 1 — one per year, kept indefinitely if set high |
Garbage Collection Jobs
Setting Up Your Garbage Collection Job
By default, a garbage collection job is already set for your server that runs daily. Any data that has been pruned gets removed when this job runs.
To edit the garbage collection job, login to the TAC.GLOBAL dashboard. On the homepage at the bottom, you should see your garbage collection job. Click Edit Job.
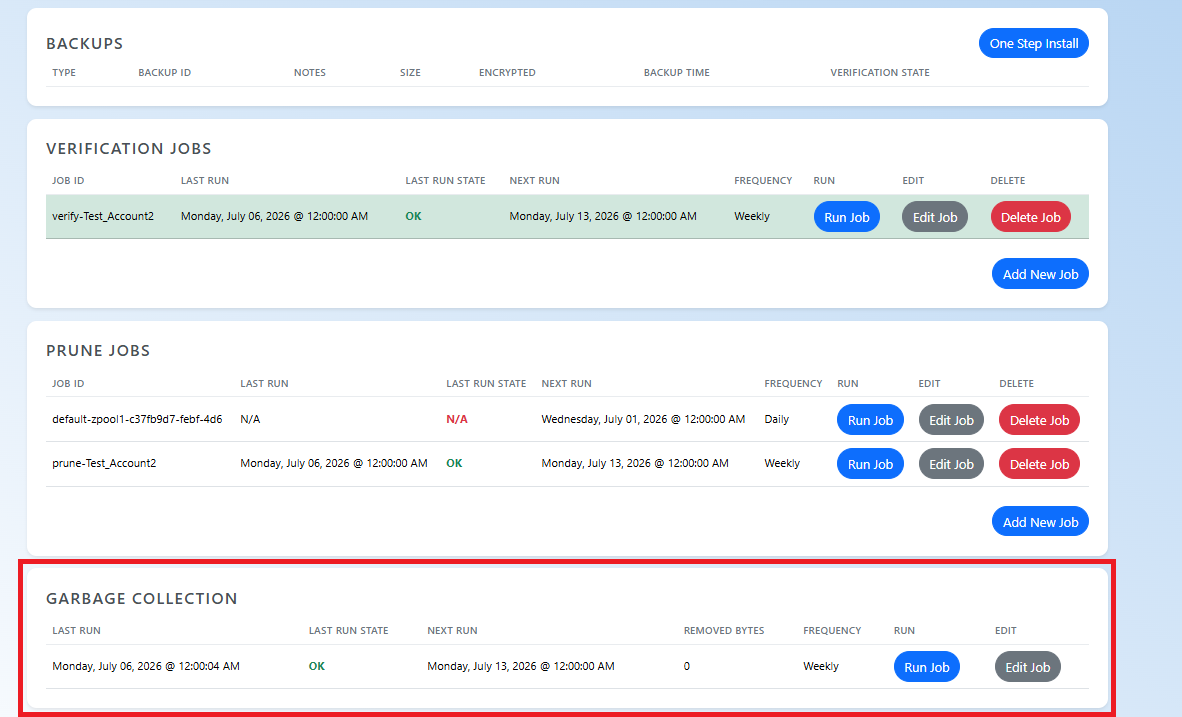
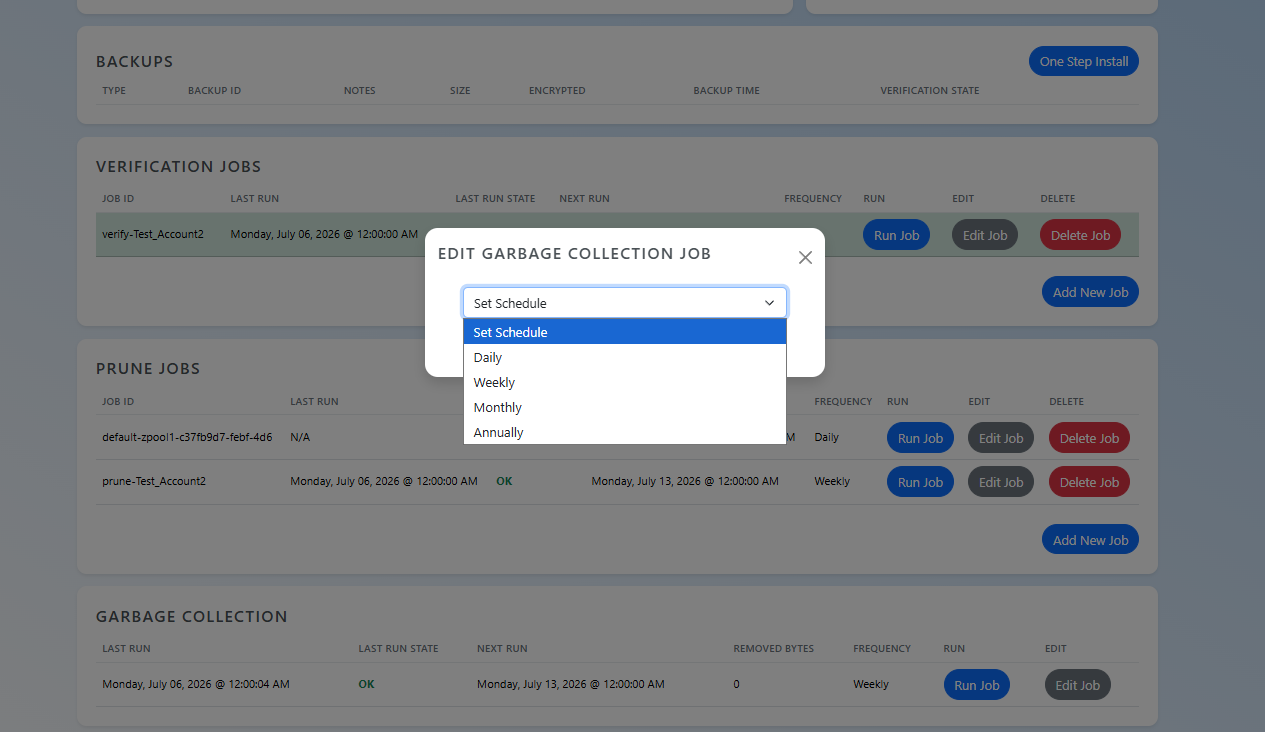
You can adjust the garbage collection job schedule from here.